Door Closer Maintenance, Repair and Adjustment
Hydraulic Door Closer Maintenance, Repair, and Adjustment info
Check out the new updated version
Disclaimer: This information may be inaccurate or dangerous, I am not responsible for your actions, use caution and common sense. I caution you to NOT disassemble the main cylinder, There's a strong high-tension spring inside that could seriously injure you if an end cap is removed.
Adjustment
These two closers shown below, and all other closers I have come across have two common adjustment settings: Sweep and Latch. Norton (and others) also have a Backcheck adjustment, and sometimes a Spring Tension adjustment.
| Adjustments common for Door Closers | ||
|---|---|---|
| Mark: | Setting Name: | Explanation: |
| S | Sweep | Rate adjustment for the long swing of the door - closing |
| L | Latch | Rate adjustment for the short final swing of the door - latching |
| BC | Backcheck | When opening: will limit/slow the maximum swing distance of the door |
| PA | Power Assist | Optional spring tension adjustment, allows to work on many different sizes of doors |

Door Closer Replacement
You may find that it is easier to just replace a door closer.
I've found that Norton brand door closers are the most common type, and are easy to find replacements for. Norton has a guide to help you determine which model of door closer you currently have: pdf
If you are unsure of which door closer you need for your door, I can make a general suggestion: For internal doors, there are two models which are very adaptible because of their adjustable spring tension. They will work on a wide variety of door sizes. Links to these two models are shown below.
Remember that if your replacement door closer is not the same model as the old one, you will need to verify that the new replacement will be installed properly. Norton door closers come with instructions and templates for mounting the door closer in the proper way and in the correct location of the door. It is important to accurately attach the door closer to specified location, as it can greatly affect proper and smooth operation!
Norton also lists their Mechanical Door Closers on their Product Page
shown are two type styles of closers: Norton and Kawneer
Sweep is from full open to latch area, typically a little faster than the Latch speed.
Latch valve is to control the last few degrees of closing, speed is typically slower than Sweep to prevent the door from slamming into the Jamb.
For notes on adjustment, see below.
It is my opinion that the Sweep rate be moderate, and the Latch rate be slow. I like the door to close behind me and to latch slowly and quietly. However, if your latch bolt doesn't engage smoothly, you might require a rather quick Latch swing rate, to slam the door shut at the end of the swing. Also, you might want your Sweep rate to be slow if the people using your door walk slowly.
Norton adjustment
This Norton closer appears to be manufactured in the 1990s
Here is a detail of the near side of the housing showing the Sweep and Latch adjustment screws.
This closer adjusts both closing rates independently. Screw in for slower, out for faster.
Kawneer adjustment
MOST door closers use two separate screws, the Kawneer shown below only uses one screw.
 This Kawneer closer appears to be manufactured in 1966. It has two adjusting screws (needle valves), one on each side.The screw farthest from the hinges adjusts the Backcheck: it limits/slows the swing before the door opens too far; e.g. so far that the door would hit a wall.
 The screw nearest the door hinges has a bevel, this screw is used to adjust both the door short and long swing rates.
- Set the Sweep rate first: Turn the beveled screw in and out to adjust the swing speed.
- Once the Sweep swing speed is set, set the Latch speed: Turn the same bevelled screw 1/2 turn in or out from your Sweep speed setting. This will adjust your Latch speed, this is very sensitive!
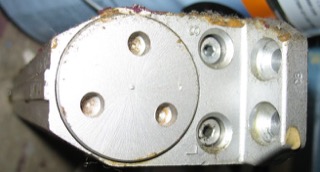
 Here is a picture of the bottom of the door closer, the two screws near the corners are used to secure the main casting to the mounting bracket. There are two more on the top.
Note the 'L' which is facing toward the floor. There is an 'R' on the opposite side of the housing. The housing is nearly symmetrical and can be used for a door which swing in either direction by flipping it and mounting the arm on the opposite side.
 The screw farthest from the hinges adjusts the door stop: it stiffens the swing before the door opens too far; e.g. so far that the door would hit a wall. Screw this in to add resistance/adjust angle resistance begins.
Alternatively, you could adjust the arm length so that the reach is fully extended at a point just before your door opens too far. I didn't do this
I forsee two implications:- The door closer may not have been intended to extend this far. In this case, the door closer may sustain damage or higher amounts of stress.
- The internal spring may fully compress/bind earlier in the door swing, taking (much) greater force to open the door or limiting Sweep travel. If you have high winds at this door, maybe that's good.
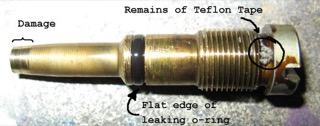
The damage is from me turning the screw in all the way, forcibly seating it, in an attempt to temporarily stop a leak.
The o-ring is visibly out-of-round, and is the source of the leak.
The Teflon tape was a failed attempt to stop the leak. The Teflon was disolved by the oil in a matter of minutes.
 Dental tool used to remove the old o-ring. Get at a pharmacy or hardware store.
 Detail of the new o-ring seal, note the round profile, which sticks out from the side of the screw. This will make a better seal than the flattened old o-ring.
I replaced two o-rings, one on each adjuster screw. Cost was less than $1.
Oil
 I have used standard household 3 in 1 oil to refill door closers which had leaked oil. However, you may also try some hydraulic jack fluid - which is easier to find thank you might think! Try Wal-Mart's automotive section or Harbor Freight.
To refill the lost oil, I removed the various adjusting screws one at a time and added oil while the door closer was removed from the door frame. I slowly cycled the door closer arm to work the air out of the system.
An 8 Fl. Oz bottle was was more then enough to top off a leaky closer.
©2006-2009 Christopher Parod